Jasmine’s Tandem Hip Carry is a great pre-tied tandem solution for wearing two babies of similar size in a single shorter woven wrap. Using a wrap as short as a Base-3 and two or four large sling rings, the wearer can have the effect of wearing two ring slings without the added expense of buying two carriers. What makes Jasmine’s Tandem Hip Carry unique is that once prepared the wrap can be left threaded through the rings and removed for wear at a later time. Once added to the carry the baby is secured and tightened before adding the next baby. This removes the need to hold tension and balance as seen in Amanda’s Tandem Hip Carry. There are two methods for tying the beginning knot. The carry can be prepared with a cow hitch knot or simply threaded through the rings without the extra work of the knot. The rings act with passive resistance, the fabric passed through the ring holding the tails in place with tension and pressure. Tension is a force acting on the wrap when it is pulled tight equally on the tails from opposite ends. This secures the wrap often tighter than a knot but without the added pressure of a large knot against your chest or back.
Benefits of a Jasmine’s Tandem Hip Carry
Using a two or four ring finish in Jasmine’s Tandem Hip Carry allows you to have a pretied, adjustable carry where each baby is secure once tightened and independent from the other baby. The two ring variation tightens both babies through the same set of rings independently but loosens both babies at the same time when the lower ring is lifted. The four ring variation allows both independent tightening and loosening, as each baby has their own set of rings. The drawback to the four ring variation is the extra pressure at the sternum of the four rings layered on top of each other. While Jasmine’s takes skill to setup, wearing has the same learning curve of a ring sling where creating a seat, tightness of the rails, and positioning are your only concerns.
Jasmine’s Tandem Hip Carry also uses a shorter wrap from Amanda’s Tandem Hp Carry. Using a Base -3 woven wrap, roughly the same size as a Rucksack carry, Jasmine’s can successfully be completed at less expense than the Base or Base+1 length needed for Amanda’s Tandem Hip Carry. Security is another great benefit of the ring finish. The ring holds the carry tight, without the wrap slipping or sliding back with baby’s every bounce. Often the amount of pressure baby places on the seat can make the carry loosen and previously unseen slack is noticed. In a ring finish you can work the slack around toward the two tails then strand by strand tighten rather than needing to untie the double knot and start again.

Jasmine’s Tandem Hip Carry in Little Frog Sunny Agate
Safety Considerations
Always use the correct ring size for your carry. A ring that is too large will not hold tension and the ring will slip, loosening the carry. A ring that is too small will produce puckering, bunch the wrap within the ring, and prevent strand by strand tightening. Placing the rings high on your chest for this carry will help with weigh distribution and prevent the yoke like feeling of the babies low on the hips and the wrap pulling at the neck. Always check your woven wrap for visible damage. Broken threads, punctures, and wear may compromise integrity of the carry and endanger both the wearer and the babies being worn.
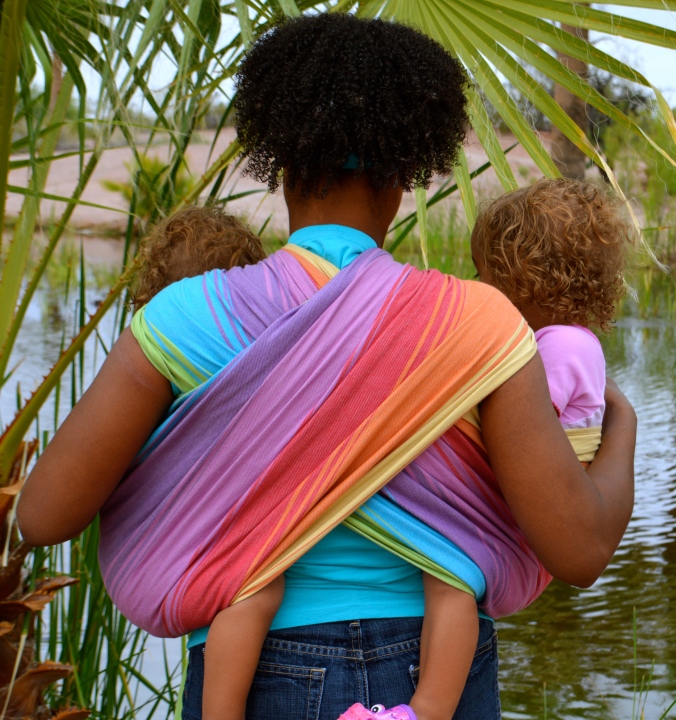
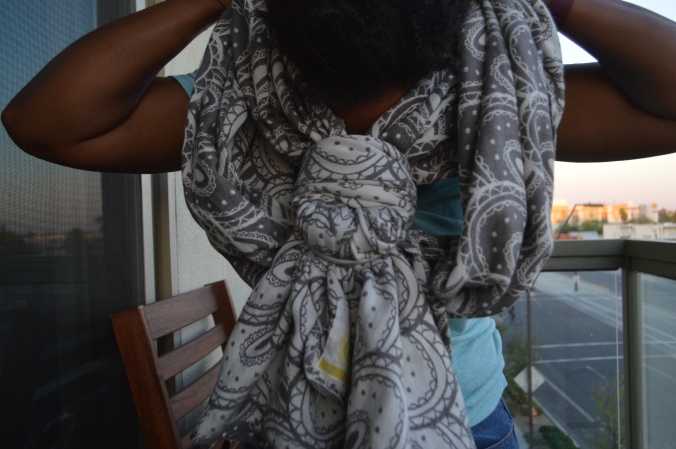
Back view of Jasmine’s Tandem Hip Carry in Little Frog Sunny Agate
Selecting the Correct Ring Size
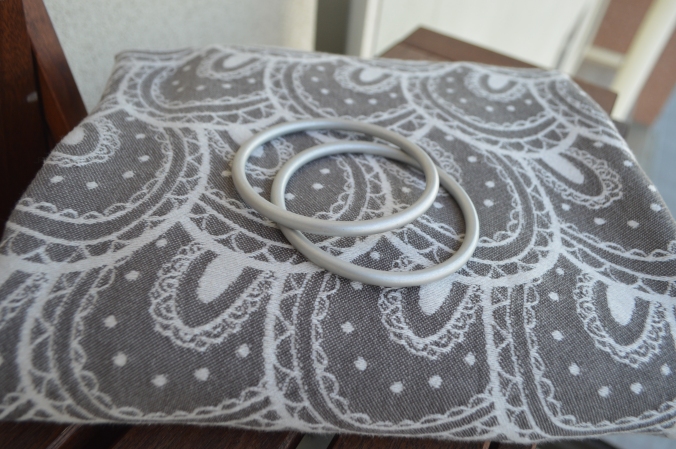
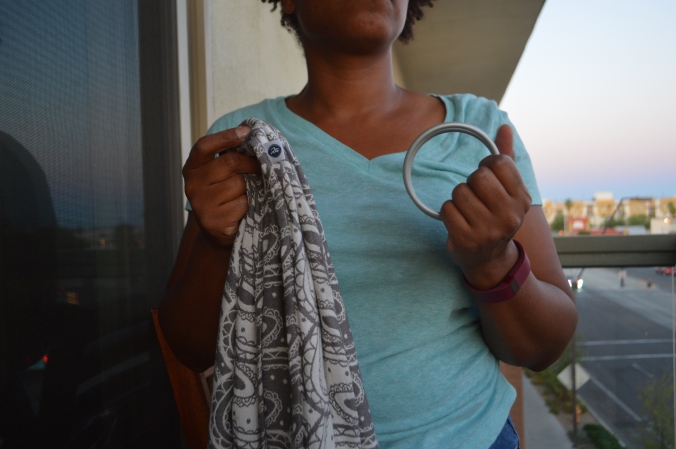
I only use tested, non-toxic, and lead free aluminum rings from Sling Rings. The rings from this particular company are an industry standard, having passed testing through the American Standards and Testing Materials International Institute (ASTM). This means that each batch of rings produced are periodically tested and weight rated to maintain a high quality standard and consistent performance. Nylon rings are also available and work best with soft, slick fabrics such as athletic mesh. The rings are available for sale in pairs of small, medium, or large. A medium ring is great for wraps 220 gsm or lower. The large ring is best on wraps 220 gsm and higher including the big fluffy handwoven wraps under 220 gsm. The wrap should pass through the ring and not bunch or fold on itself in the ring.
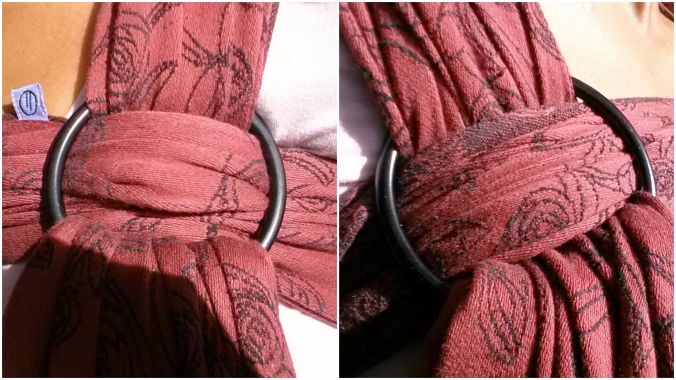
Medium versus large ring finish. The image on the left shows the medium ring and the image on the right snows the large ring finish. This is the same wrap in both image, Oscha Slings Copper Beech
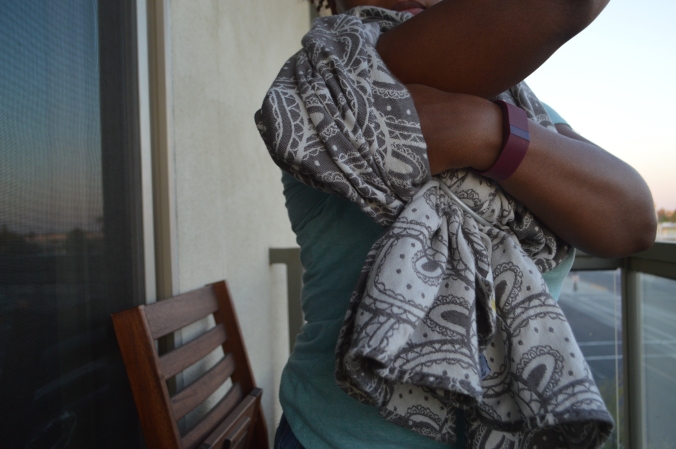
Jasmine’s Tandem Hip Carry, Two Ring Variation
Risaroo Kerrington Carbon and Two Large Sling Rings
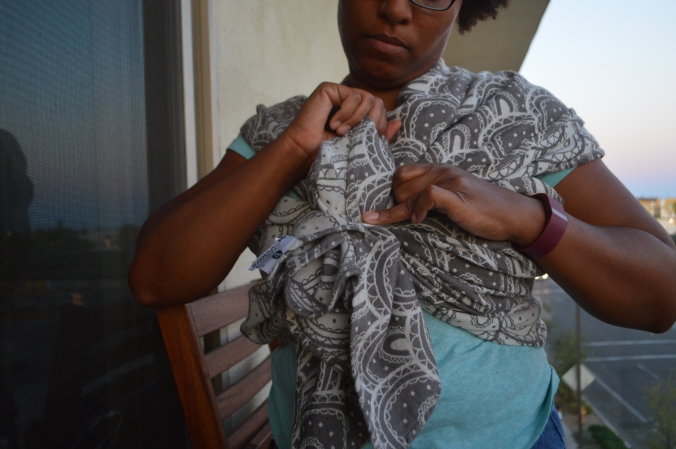
Cow Hitch Knot
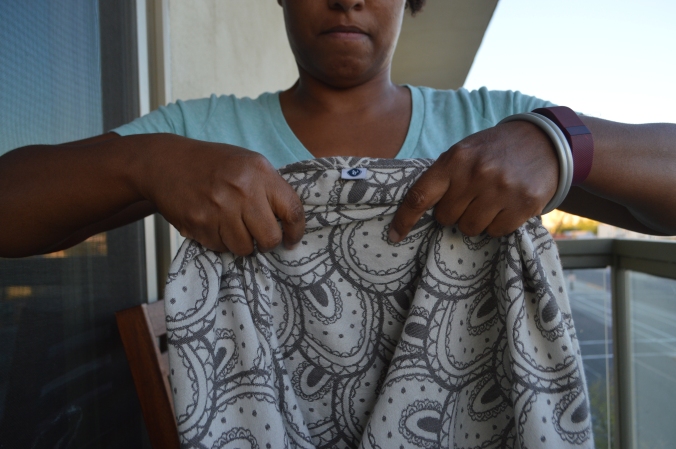
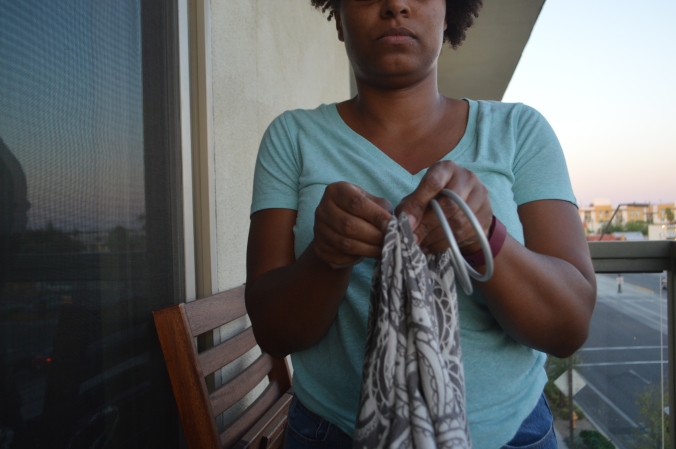
- After determining which ring is the correct size for the wrap you are using the next step is to complete your carry. I am wearing a two ring variation in a Base -3 which is a size 4 for me in Risaroo Wovens Kerrington Carbon and a two large Silver sling rings. The first step is to thread the wrap through both rings at the middle marker.
Starting at your middle marker
- Accordion fold the woven wrap to thread it through the rings. This step allows the wrap to fold evenly and neatly through the rings preventing bunching.
Folding the wrap at the middle marker
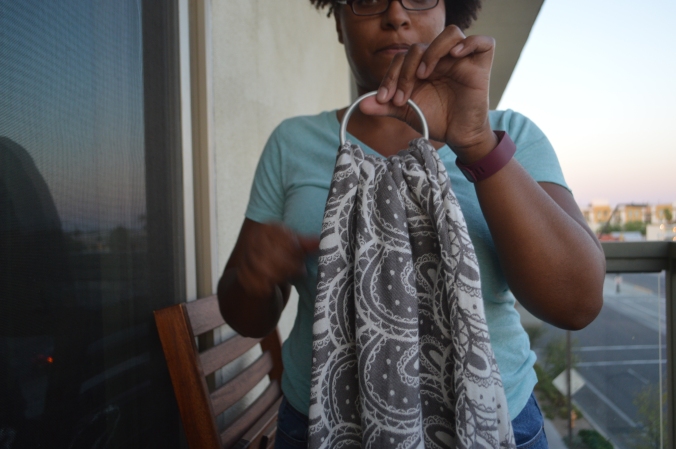
- Fold the wrap in half lengthwise making a loop at the middle marker. Pull the loop through both rings to give approximately four to five inches through the top of the rings.
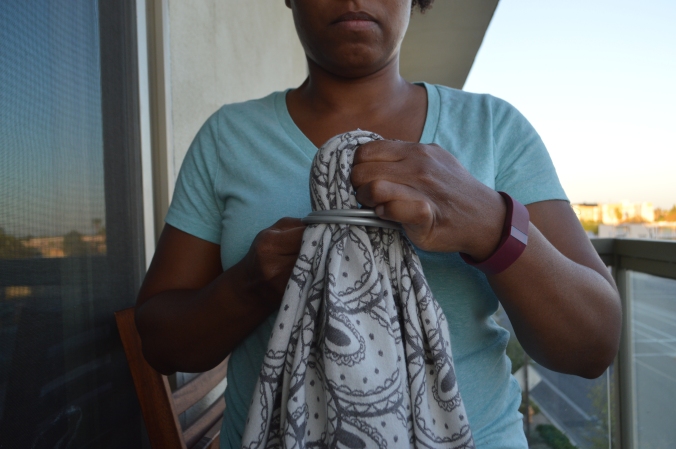
Feeding the loop through the rings
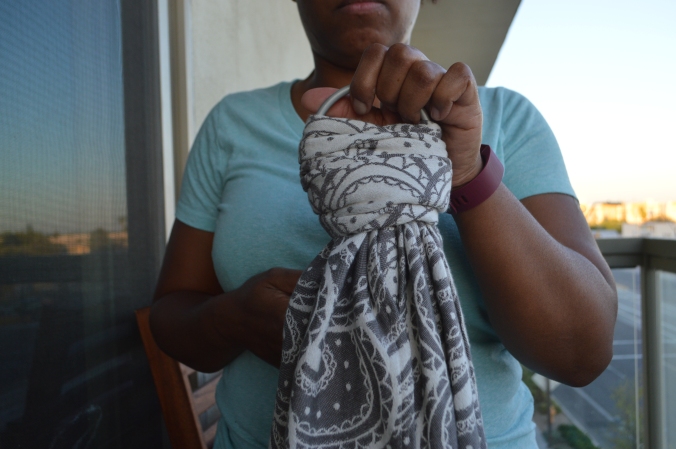
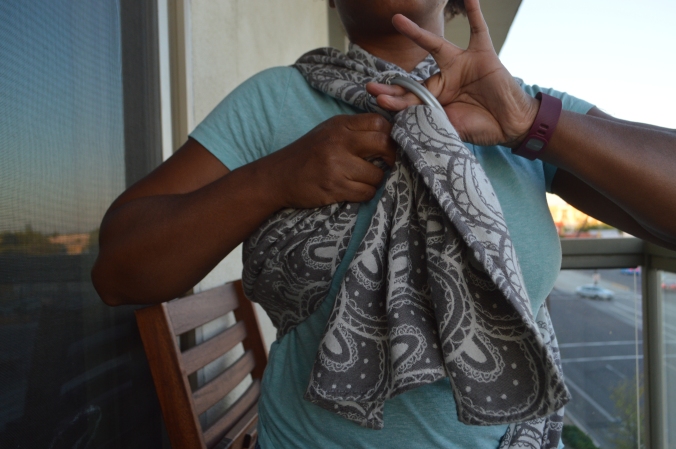
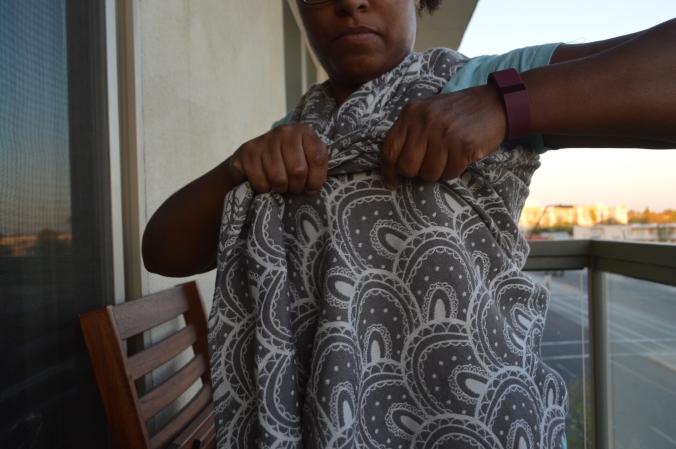
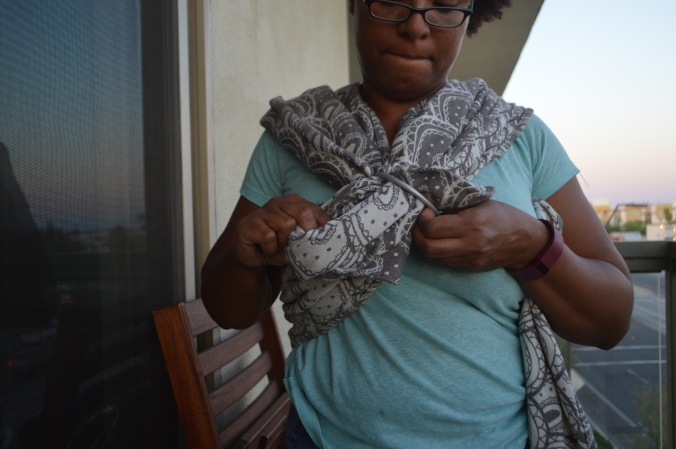
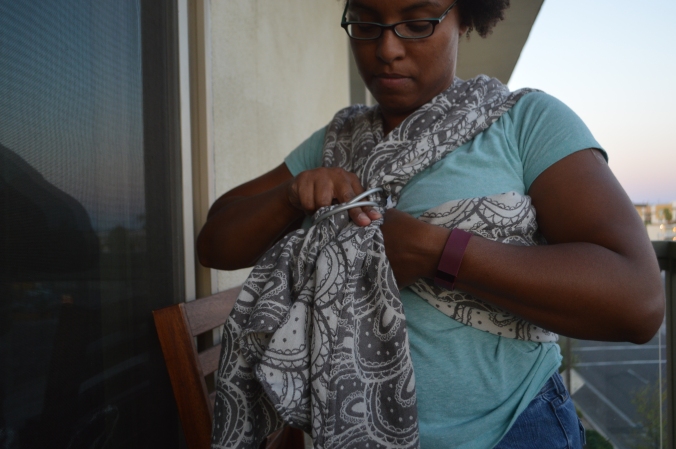
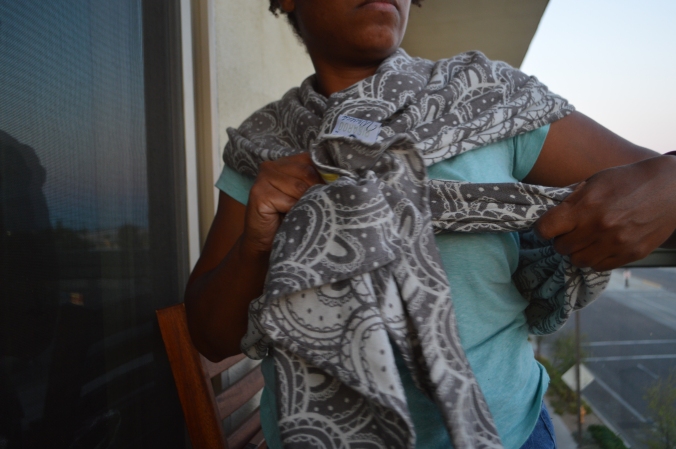
- For the Cow Hitch knot you will fold the loop down over the two rings.
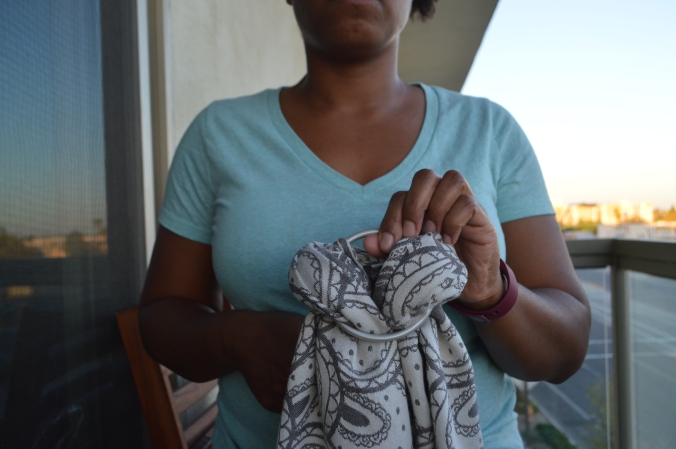
Completing the cow hitch knot
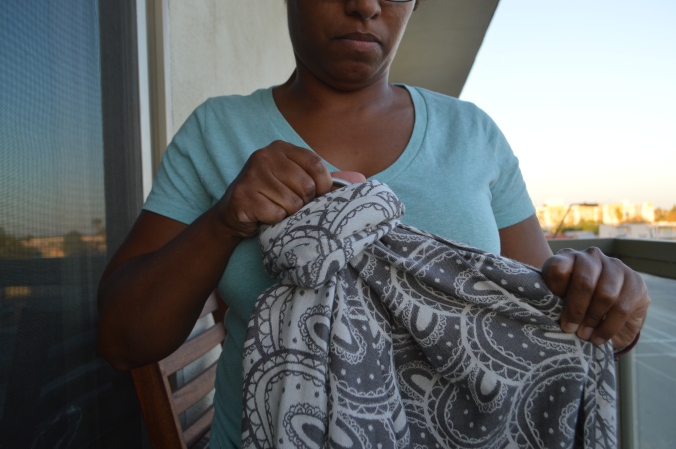
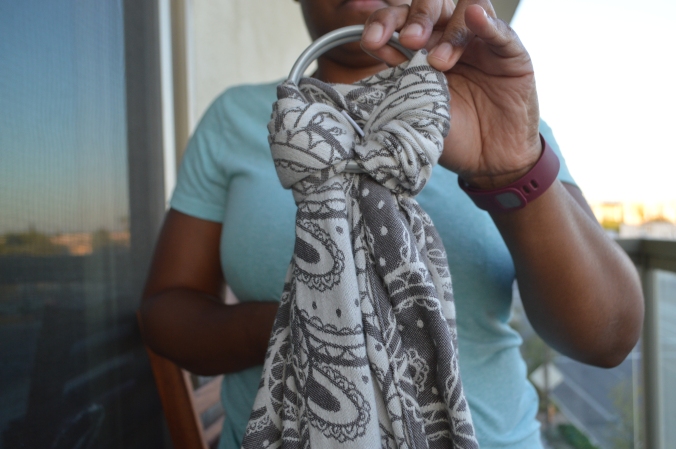
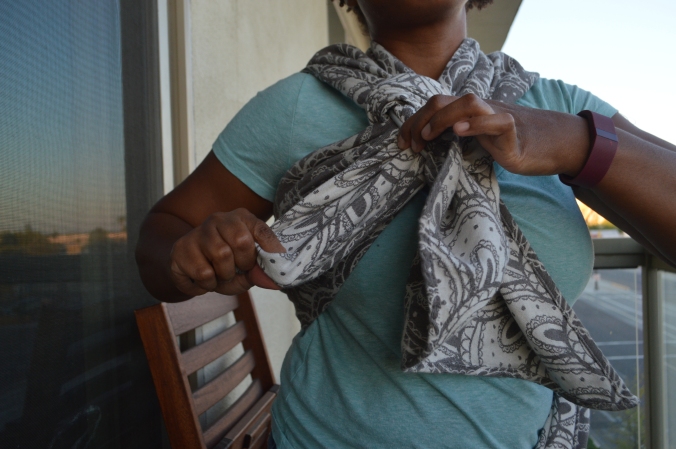
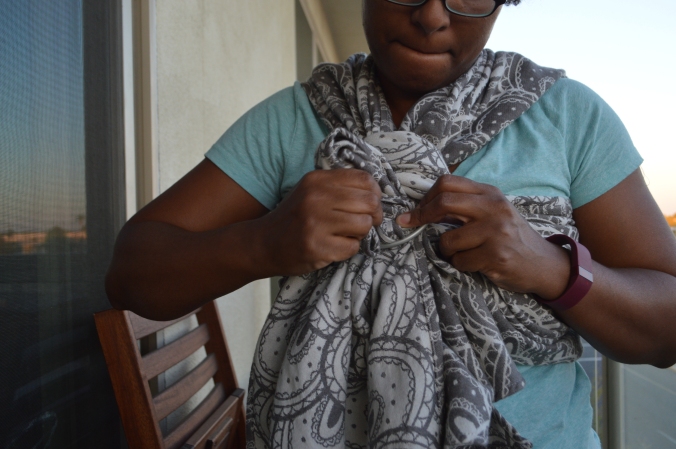
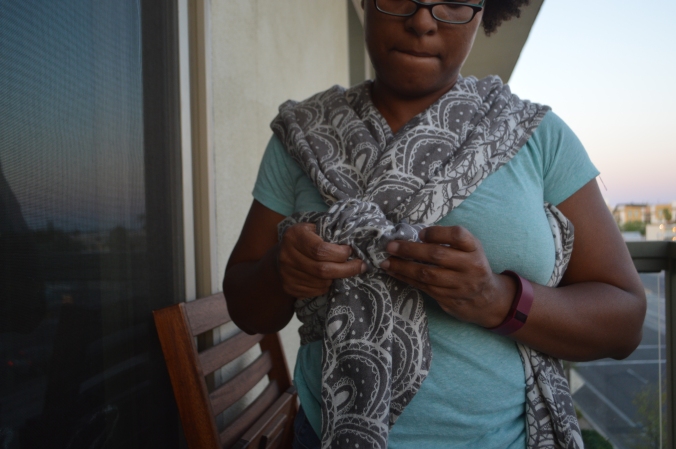
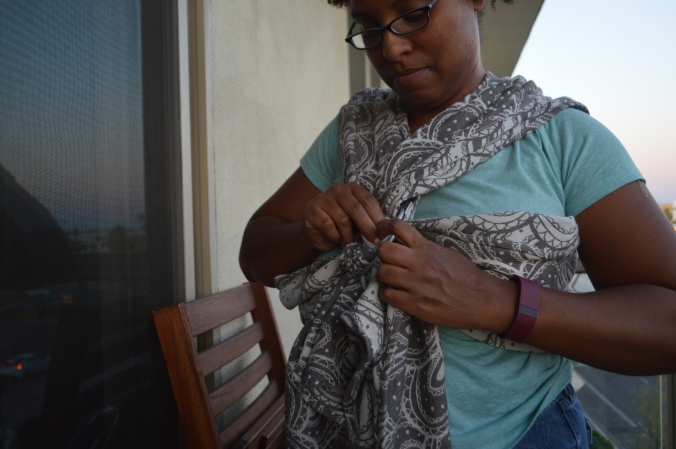
- Pull tightly, strand by strand, on the tails to secure the knot. Make sure it is very tight, all of the weight will rest on this point.
Tightening the cow hitch knot
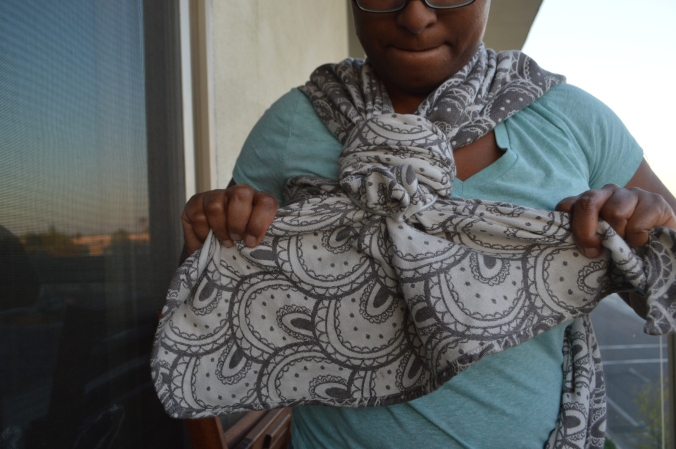
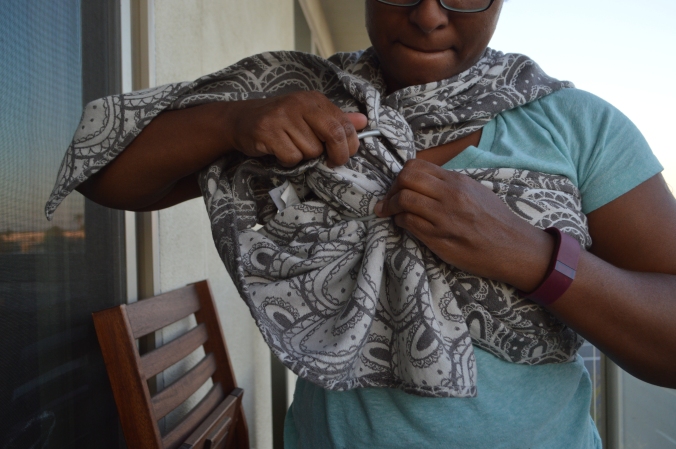
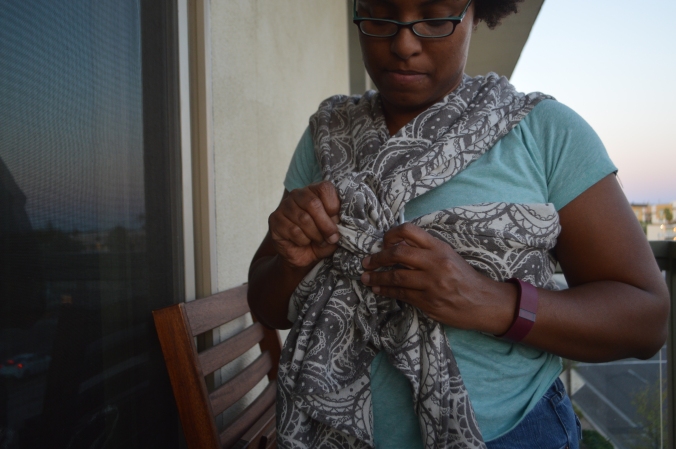
- Your completed cow hitch knot should be very secure, does not slip, and should make parting the rings a little bit of work.
Completed cow hitch knot from the front
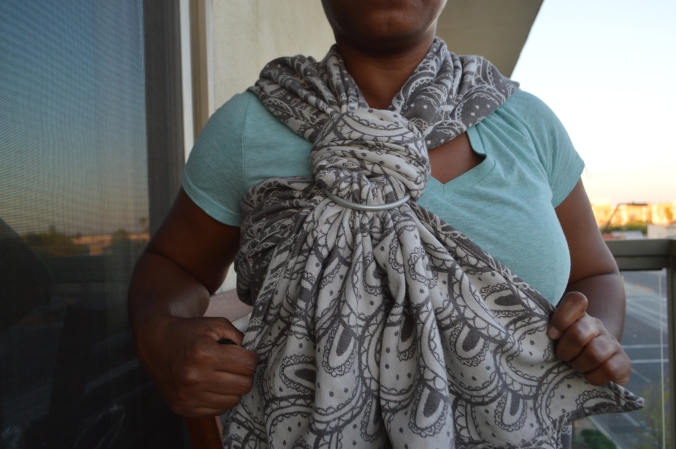
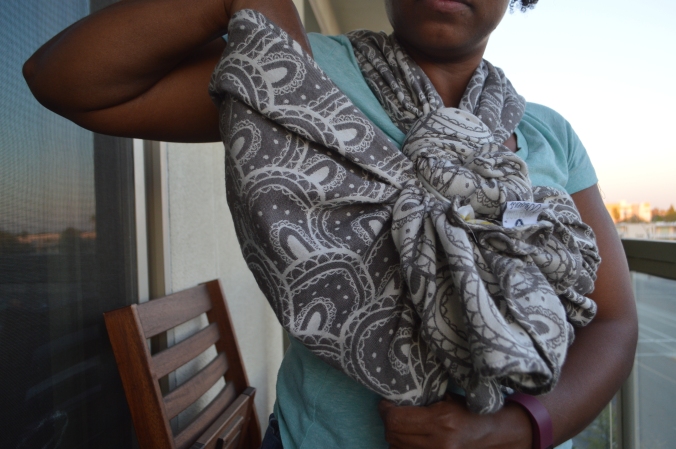
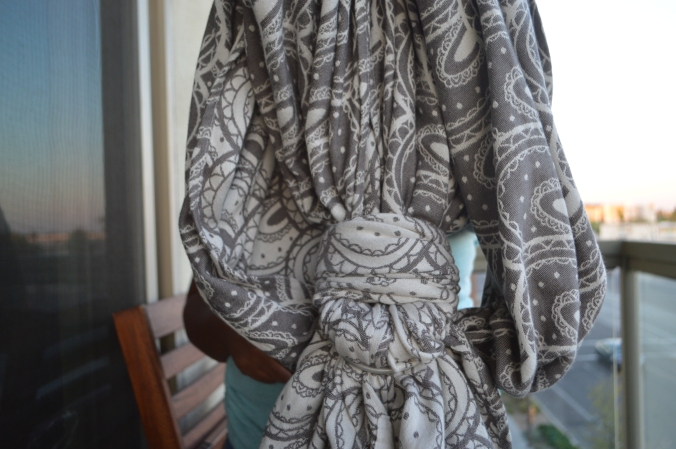
Back view of the cow hitch knot
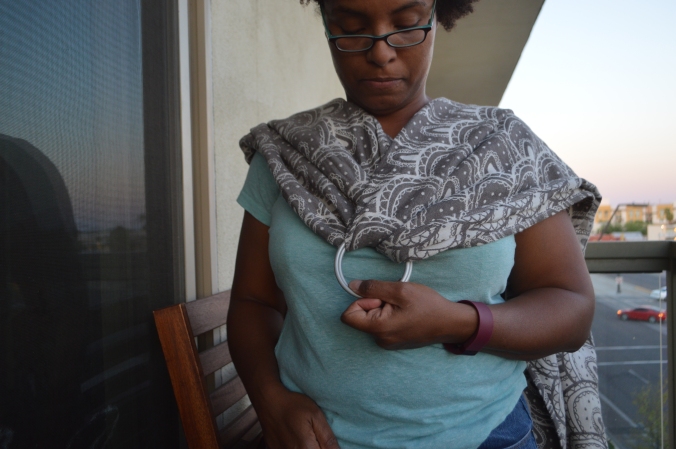
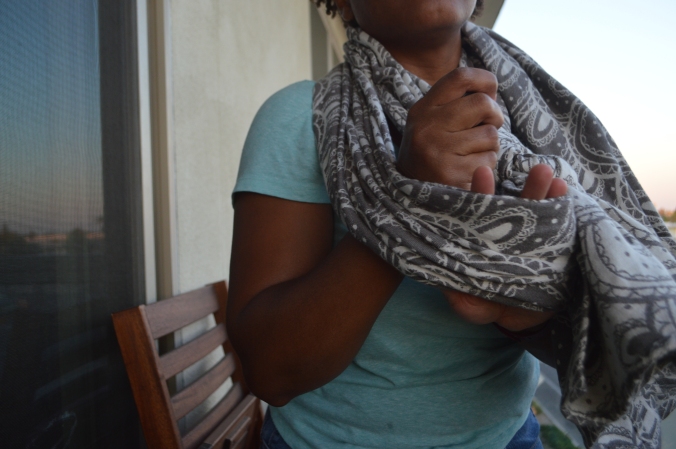
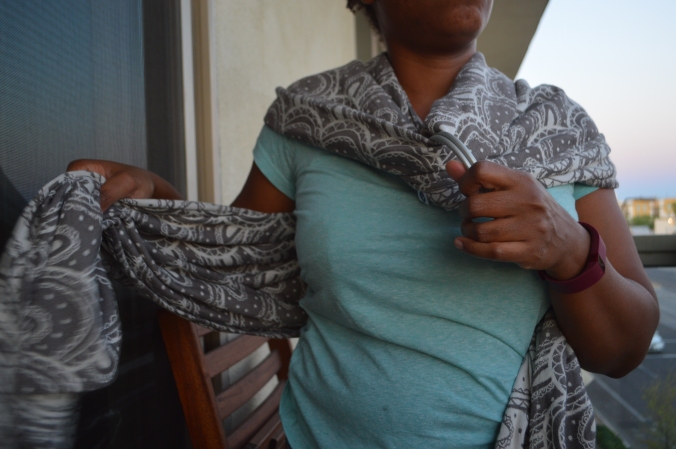
- Place the ring high on the center of your chest with one tail over each shoulder.
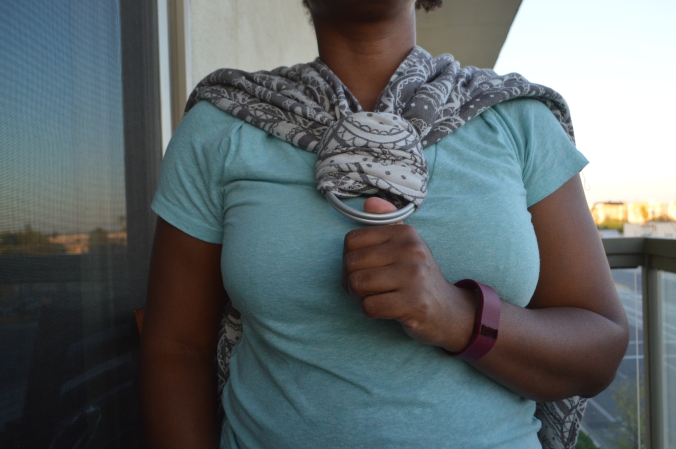
Rings placement
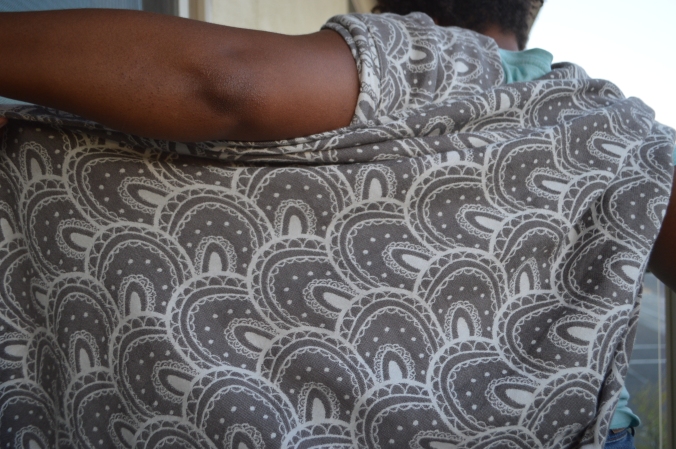
- Cross the tails across your back making an X-shape. Make sure the tails are spread wide, this will help distribute weight across your back.
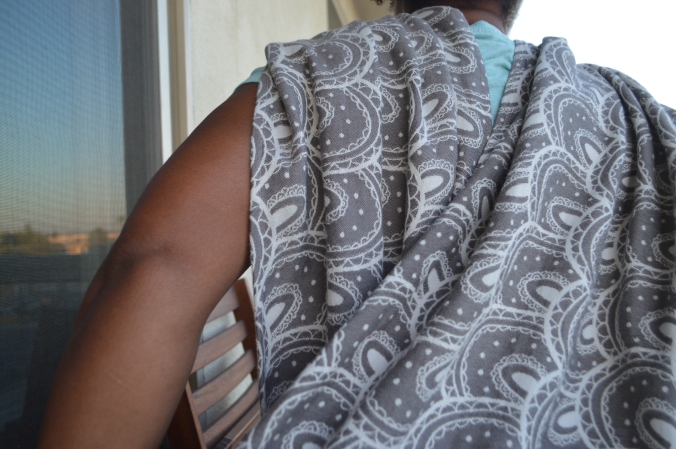
Crossing the tails
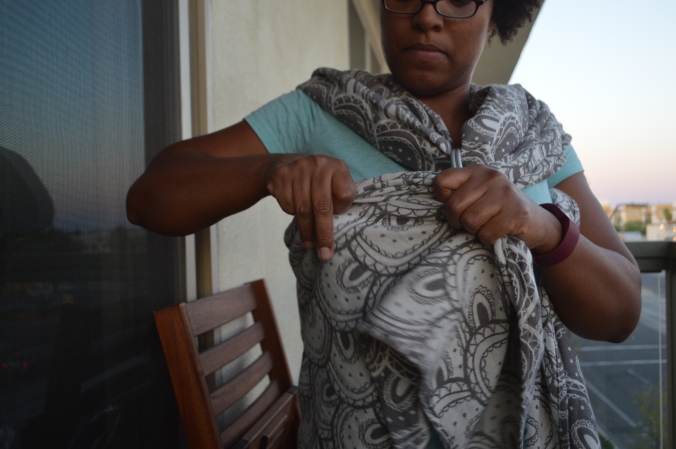
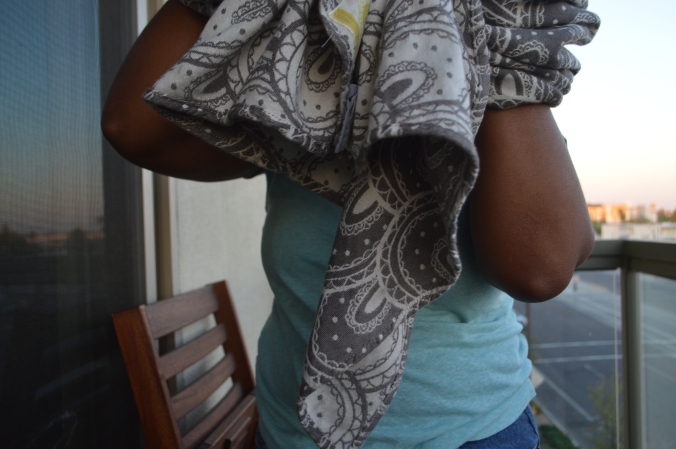
- The next step is to accordion fold the tail to prep for threading. This is an important step for this carry. Take the time to fold the wrap end over end before threading through the rings. This ensures that the wrap is not bunched and can be easily tightened once baby is added to the pouch.

Accordion folding the tail for threading
- Thread the folded tail through both rings.
Threading the first tail through the rings
- Make a pouch for baby to sit no larger than the size of your arm folded inside the pouch. Now lift the top ring and spread the rings.

Threading through the lower ring
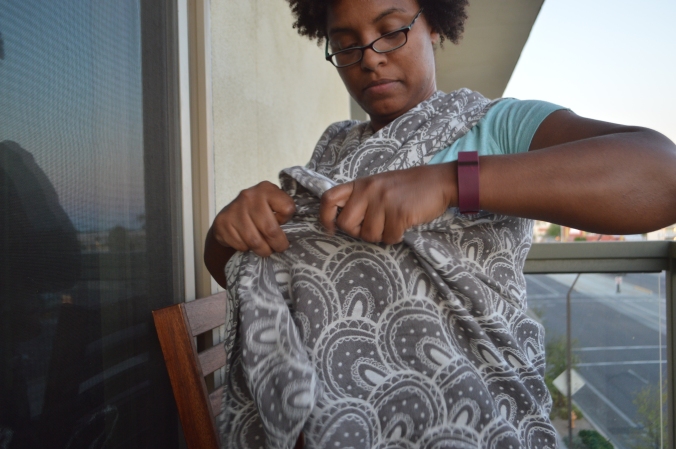
- Pass the folded wrap through the bottom ring only. Pause to fan out the wrap in the space between the rings.
Adjusting the pouch size
- Tighten the tail strand by strand through the rings to secure the pouch.
Strand by strand tightening the first tail
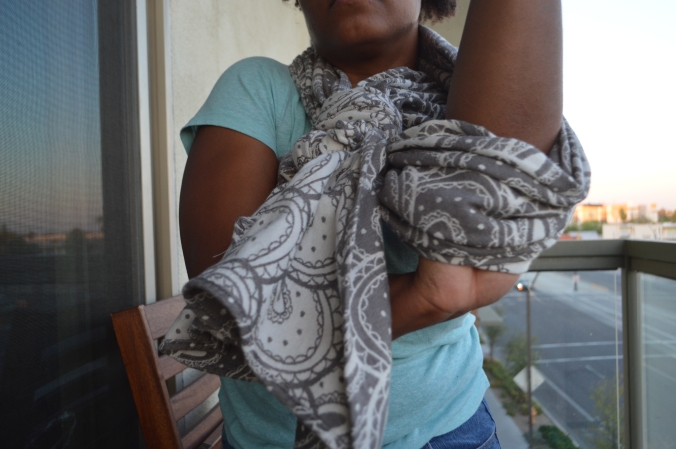
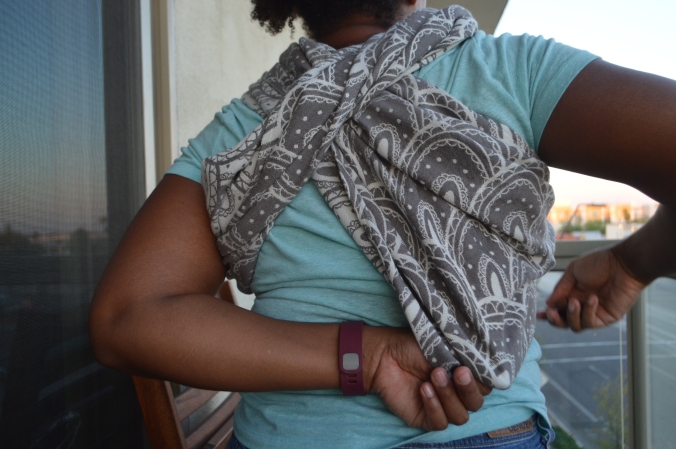
- One side completed. Now let’s work on the other side.
Completed first pouch
- Repeat the accordion fold for the other side.
Accordion folding the second tail
- Thread the tail through both rings.
Threading the second tail through both rings
- Spread the rings and thread the folded tail through the bottom ring only. Spreading the rings may take some force at this point. That is a good sign that your carry is tight and will be secure. If it is too tight to move the rings you may need to try the simple threaded version or move up a ring size. Currently the largest sling ring is the large ring, if there is difficulty in separating the rings try the simple threaded version.
Spreading the rings to thread the bottom ring
- Take a moment to fan out the tail in the rings. Tighten the tail strand by strand to secure the carry.

Tightening the tail through the bottom ring
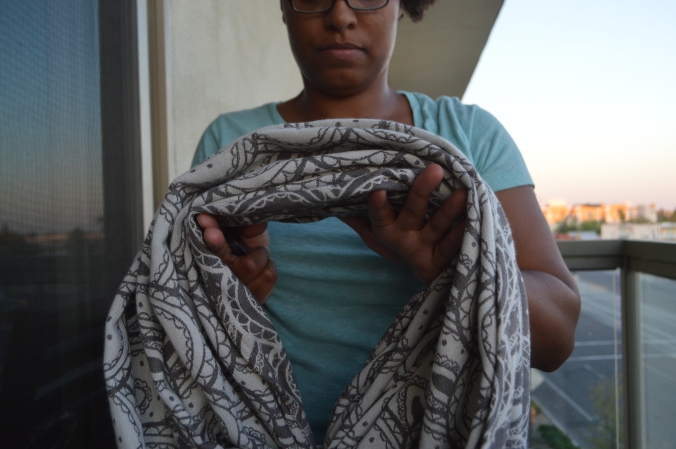
- Completed setup with both tails threaded and the two pouches for your babies.
Your pouches for baby to sit
Simple Threaded Variation
- Accordion fold the wrap at the middle marker. This will make sure the wrap is easy to spread once threaded in the rings.
Starting at the middle marker
- Thread one tail completely through both rings so that the rings rest at the middle marker.
Threaded through both rings
- Place the rings high at the center of your chest with one tail over each shoulder. Note that the other side of the wrap will be seen on the opposite shoulder.
Positioning of the ring on the chest
- Cross the tails over your back spreading wide to distribute weight.
Spread the tails across the back
- Accordion fold the first tail
Accordion fold the tail
- Pass the folded tail through both rings. Leave space for a pouch for baby to sit at your hip.
Thread the tail through both rings
- Spread the rings and pass the wrap through the bottom ring only. Take a moment to fan out the wrap between the rings. Now tighten strand by strand.
Thread the tails through bottom ring
- Accordion fold the second tail
Accordion fold the other tail
- Pass the folded tail through both rings leaving a pouch for your second baby to sit.
Threading through both rings
- Spread the rings. Pass the folded tail through the bottom ring only.
Threading through the second ring
- Take a moment to fan out the tail to make sure you can strand by strand tighten.
Spreading the tail between the rings
- Your setup of the carry is now completed. You should have two pouches for your babies to sit.
Pre-tied Solution, No worries
As previously mentioned Jasmine’s Tandem Hip Carry is a great pre-tied solution that you can prepare then take off and store ready for next use.
Getting out of the carry
- Slide your arm out of one side of the carry.
Slide your arm out
- Slide your other arm out of the carry.
Slide out your other arm
- Lift the ring over your head.
Up and over your head
Off for storage and ready to wear
Prepped and ready for next use
Getting back in
- Start by holding the ring and both loops in one hand.
Placing the loops one on top of the other
- Pass the entire carry over your head.
Place both loops over your head
- Slide your arm into the carry.
One arm in at a time
- Slide your other arm into the other loop

Slide the other arm in
- Spread the passes in back
Spreading the passes
- Spread your shoulders and you are ready to add your babies.

Ready to wear!
Getting out of a Jasmine’s Tandem Hip Carry
Now that you are all secure and babies are hopefully asleep in a wrap nap, you have to get out of the carry. This is also easier and more secure than untying a knot. The ring finish is all tension so releasing the tension is all you need to do.
- Release the tension from the ring by gently lifting up on the edge of the ring where the tail last passes through the ring. This can be either the bottom or the right side of the ring. I recommend the right side of the ring as it will continue to hold tension on the other tail giving you a moment to release the wrap from the ring.
Removing the tail from the ring
- Loosen the one side and lift baby up and out to a safe place. Repeat for the other baby again lifting on the edge of the ring to loosen the carry. Now you can start unthreading the first tail passed through the ring.
Unthreading the other tail
- Repeat for the other side, loosening the tail from the rings.
Both tails released
- Remove the rings from the wrap and you’re done.
Ready to fold & store
Want to see the four ring variation and prefer to work along in a video, I’ve got you covered. If you prefer to watch it directly in YouTube click the arrow pointing right in the upper right hand corner.

Hi
I think you are my new babywearing crush! (I first got into BW watching the wrapyouinlovw lady). I love reading your reviews on carriers and your fantastic description of them. I love the “geeky” stuff such as weight weaves etc. Thank you for sharing your wealth of experience. It doesn’t hurt that your girls are adorable. I have only gotten into wovens recently (my daughter is 2) and so wish I had started earlier but you encourage me to know I can do it for a while yet. Thank you to you and your beautiful family.
A fan from Australia.
LikeLike
Thank you Mai!
The ladies are adorable, though I say it myself. Babywearing has been a blessing for my family. My girls are so much happier and in turn the entire family. We are working on some exciting new things for the page as we transition to offering more content as well as in-person babywearing consults. Thank you for following and allowing us to be a part of your babywearing journey ❤️.
LikeLike